


Brakes
Release Force Setting (DIN)
Recommended DIN Range for Ski Bindings
Features and Options
Ski Bindings and Ski Boot Norms
Specialized Bindings
Alpine Touring Ski Bindings
Mounting Your Ski Bindings
Maintaining Your Ski Bindings
To choose a ski binding start by determining:
The waist width of your skis.Your DIN setting (may require assistance from a certified ski binding technician).
The waist width of your skis will determine what size brakes you need, while your skiing ability, weight, height and boot sole length will determine the bindings' release force setting (DIN). Once you've established an accurate DIN range and brake width, you can look at additional binding features.
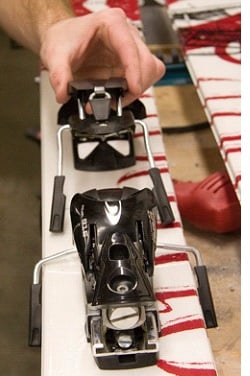
After selecting your ski bindings always have a certified ski technician mount and make the appropriate adjustments to ensure the bindings operate safely.
Brakes
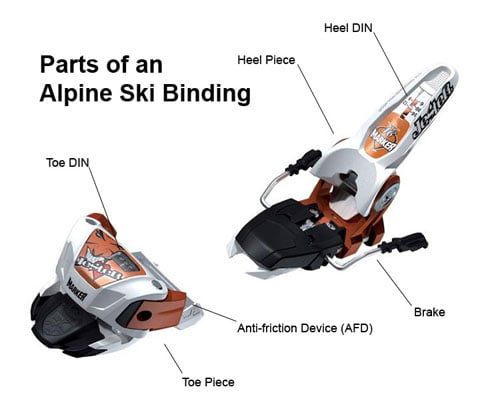
The arms attached to the heel piece of your ski bindings that stick out on the side of your ski are called brakes. Ski brakes are designed to stop your skis after release so you can retrieve them quickly and so they don't pose a danger to other skiers.
Is the brake wide enough for your skis?
Your skis’ waist width will determine the ski brake width (the distance between the two brake arms). For example, if your skis are 80mm wide at the waist, you will need bindings with a brake width of at least 80 mm and preferably no wider than 95 mm. If your brakes are too narrow they will not clear the edges of your skis and will not deploy properly when your ski comes off. If your brakes are too wide they may drag when you put your skis on edge, especially on steeper terrain.
Wide brakes for fat powder skis can often be purchased separately. The narrow brake is removed from the ski bindings and replaced with the new wide brake. Not all binding models offer user swappable brakes, so ask your shop and have a certified technician perform the work if needed.
DIN Range for Ski Bindings
|
Skier Weight |
25-65 lbs |
30-100 lbs |
50-165 lbs |
|
Ability Level |
Beginner - Intermediate |
Beginner - Intermediate |
Beginner - Intermediate |
|
Brief Description |
Lightweight children |
Junior skiers |
Heavier beginning or beginning to advanced junior skiers |
|
DIN |
.5 to 2.5 |
.75 to 4.5 |
2 to 7 |
|
65-200 lbs |
65-240 lbs |
65-250 lbs |
130-285lbs |
|
Beginner - Intermediate |
Beginner - Advanced |
Intermediate - Expert |
Intermediate - Expert |
|
Intermediate junior skiers or lightweight beginning adult skiers. |
Beginning skiers or lightweight intermediate to advanced adult skiers. |
Intermediate skiers who are heavier or lighter weight expert adult skiers. |
Heavier or more aggressive intermediate to expert adult skiers. |
|
3 to 10 |
3 to 11 |
3 to 12 |
6 to 14 |
|
130-200lbs+ |
150-200lbs+ |
|
Intermediate - Expert |
Expert - Pro |
|
Heavier skiers, very aggressive advanced and expert adult skiers. |
Aggressive expert big mountain skiers and racers. |
|
6 to 16 |
8 to 18 |
Important Notice: This chart is intended only to give you an idea of the general DIN range you need. There are a number of factors which influence binding adjustment and the settings must be precise, so use this information to help select an appropriate model of binding but don't try to set the DIN yourself..
Strength
Another important aspect of a ski binding is its strength. Higher DIN bindings designed for advanced and expert skiers are built with beefier construction and stronger materials to accomodate the higher forces generated while travelling at higher speeds and negotiating steeper, more technical terrain. Generally, the more advanced the skier the stronger and more elastic their binding should be. Attributes which contribute to a binding’s durability include material density and tensile strength, DIN range, metal parts instead of plastic, stiffness and design of pivot points.
Ski Binding Features and Options
Now that you understand DIN settings and ranges, know your brake width and have decided how strong a binding you need, you're ready to decide on a ski binding - but there are more choices than types of pasta in Italy. The following features cater to skiers with specific styles and help to differentiate between appropriate bindings.
Anti Friction Device (AFD)
The AFD can be a sliding mechanism or a low friction fixed device on the binding's toe piece that sits under your ski boot. It is a smooth piece designed to minimize friction between the binding and the boot during a lateral release. The purpose of the AFD is to allow the boot to slide sideways more smoothly during release.
Elastic Movement
To reduce the likelihood of inadvertent release, bindings allow a certain amount of elastic travel for vertical and lateral movements before the skier releases. The elastic movement in your bindings is also designed to provide substantial shock absorption during landings or in bumps. Some bindings provide a greater range of elastic movement than others.
Riser Plates
Riser plates reached a height of popularity in the mid 2000's with racers and carving oriented skiers, because they allowed more leverage and steeper lean angles. Because of limits placed on risers by the FIS (Fédération Internationale de Ski) and the growing popularity of types of skiing other than racing that lend themselves to a flatter binding placement, their popularity has dwindled.
Flat Skis vs. Skis with Integrated Bindings
Skis sold without a binding are referred to in the industry as "flat." Most flat skis will accept most bindings, but there are exceptions. System or integrated bindings are mounted to a plate or track on the ski. These bindings are designed to be paired to a specific ski. If you are unsure about a specific ski/binding combination, ask a certified ski tech.
Ski Bindings and Ski Boot Norms
What if I get new ski boots or my boots don’t fit my new bindings?
If you buy new boots and want to use them with your old skis, you'll need to have your bindings adjusted to accommodate the new boot sole length and tested by a shop tech. Buying the same Mondopoint size does not guarantee that the boot sole length (BSL) will remain the same. All alpine bindings have some adjustability, but the range of adjustment is limited and in some cases the bindings will have to be remounted to work with a new boot. Adjusting or remounting your ski bindings in these circumstances is not something you should do yourself. In all cases it is highly recommended that any changes or adjustments to your bindings required to accommodate your boot be made by a certified technician.
Alpine Norms vs. Touring Norms
Traditional alpine (downhill) ski boots have a specific sole shape, defined by the international standard ISO 5355. All adult and children's alpine boots must conform to this standard, and are mutually compatible with alpine bindings conforming to the related standard ISO 9462. Alpine Touring boots use a different sole shape, referred to as ISO 9523, which is not compatible with many alpine bindings. In addition, there are two new sole types not defined by ISO/DIN standard - WTR (Walk to Ride) and GripWalk - which feature rockered traction soles with a smooth AFD pad at the toe. Each sole type has its own list of compatible bindings, which changes annually.Junior Norms vs. Adult Norms for Alpine Ski Bindings and Ski Boots
All current alpine boot manufacturers make ski boots with different adult and junior norms that meet ISO (the International Organization for Standardization) specifications. Alpine ski boots are typically stamped with “ISO” or “DIN” to indicate that they conform to these norms. Generally, adult ski boot sole dimension norms begin at size mondopoint 22 (US Men’s Size 4) and go up to 31.5 or even higher. Junior ski boots run from mondopoint 14.5 to mondopoint 22.5. This is critically important to note, as you'll need a ski binding that conforms to either the adult norm or junior norm. You cannot use a junior norm ski boot with an adult ski binding. Most junior bindings, which have lower release settings, can accept adult boots but almost no adult bindings will accept junior boots. There are a few exceptions of junior bindings that will accept either type of boot, and if your child is at the stage where he or she is in between junior and adult products it may make sense to check out one of them. Before making a purchase or mounting decision, always confirm that the binding you select for a junior is, in fact, a junior-specific binding.
Junior Skis vs. Adult Skis
Ski bindings must be compatible with the user’s skis as well as their ski boots. A thin profiled junior ski is not deep enough to accommodate adult length ski binding screws. Adult screws are designed to sink approx 8mm into the ski where junior binding screws are designed to sink only about 6mm. The extra length of an adult screw doesn’t seem like much but it is enough to leave bumps in the ski base of a junior ski. Additionally, if you were to use kids' binding screws on an adult ski the screws may not have enough depth to hold the binding to the ski under normal pressure applied by an adult.
Specialized Bindings
Variable Mounting-Position Systems
A screw on the front of the toe piece allows skiers to make on-hill adjustments. For example, move your bindings back to ski pow in the morning then move them forward in the afternoon to session the park.Demo Ski Bindings
Demo ski bindings are usually used on demo skis or rentals and are designed to adjust to a large range of boot sole lengths quickly and efficiently. If you buy a used ski package, the ski bindings included may be demo bindings. Demo bindings often have a wheel or a scale on the plate between the heel and toe piece that will indicate the boot sole length the binding is set for. Although demo bindings are relatively easy to adjust, it is highly recommended that you have demo ski bindings properly adjusted and tested by a certified technician.Alpine Touring Ski Bindings
Alpine Touring (AT) ski bindings allow the skier to lift their heel to travel uphill with climbing skins and lock it down for descending. AT bindings are designed for touring but can often be used successfully for lift served skiing as well. Various design solutions offered by a number of manufacturers allow this dual purpose (uphill and down) function.
Alpine touring bindings can generally be divided into two types, frame AT bindings and tech (Dynafit-type) bindings. Frame bindings have toe and heel pieces like alpine bindings that are connected by a plastic or metal frame, while tech bindings rely on the rigid sole of the ski boot as the "frame" and require a boot with special molded-in toe and heel fittings.
Alpine Touring (AT) Ski Boot Compatibility
Alpine touring ski boot toes and heels have different dimensions than alpine ski boots. AT boots often feature rockered lugged soles for security when walking on steep and slippery surfaces, and some have tech fittings molded into the toe and heel to enable the use of lightweight tech bindings. These soles are often incompatible with common alpine bindings. Ask your shop or a certified technician if you are unsure about a specific boot/binding compatibility issue.
Telemark Ski Bindings
Telemark bindings are designed to be used with telemark boots, which flex under the ball of the foot. The heel of the boot is free to travel up and down permanently in order to facilitate telemark turn technique. We do not currently sell telemark bindings.

